Ecommerce Templates > PHP
Version Help > Payment Processors > Ogone

Ogone and Ecommerce Templates
Once you have created your account with Ogone the
first thing you will need to do is download the file ogonephp.zip from
our downloads page.
The zip file contains three files, ogonereturn.php, customppsend.php
and customppreturn.php.
- Copy the file ogonereturn.php in the vsadmin directory to the
vsadmin directory of your site. Copy the 2 files customppsend.php
and customppreturn.php to the vsadmin/inc directory of your site.
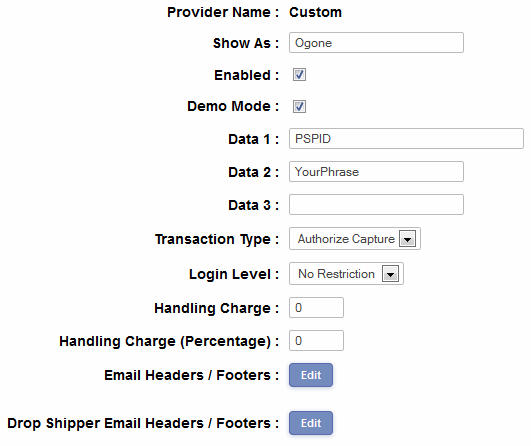
- Log in to your Ecommerce Plus Template admin section, and click
on Payment Providers, then click on Modify for the Custom payment
provider.
- In Data 1 enter your PSPID provided to you by Ogone.
- In Data 2 enter a word or phrase that can
be anything you like. For instance it could be . . .
lemonsquash
lilypond987
Knjc89jcng9oPdf4
. . . that is, anything really using numbers and letters as above. Please
don't use our examples though - choose your own!
- Make sure "Enabled" and "Demo Mode" are set on that page.

- Now log in to your Ogone control panel using this URL while in test mode . . .
https://secure.ogone.com/ncol/test/admin_ogone.asp
- There are many choices on the Ogone configuration panel but
most of them are better handled by Ogone support representatives.
We will just deal with the parameters that affect the cart integration.
You will find these on the page Configuration -> Technical
information.
1.1. method: POST
2.1. IP address of the server... : Enter here the IP address of your server.
Ask your host if not sure.
2.2. URL of the merchant page containing the payment form...: Enter the full
URL of your cart.php page.
An example would be . . .
http://www.yoursite.com/cart.php
3.2. SHA-1 Signature Related FAQ Question: Enter here the value you entered for
Data 2 in step 4.
4.1. Urls: If the payment's status is "accepted" or "on hold" or "uncertain" URL of the merchant's post-sale page
Set this to the URL of the page ogonereturn.php you copied to your site. For instance . . .
http://www.yoursite.com/vsadmin/ogonereturn.php
4.2. Request Type: Make this request just after the payment and let the result
customize the answer seen by customer (HTML code or redirection).
4.3. Others: SHA-1 Signature : Set again to the same value you entered for Data 2 above.
8. Processing: Online (Immediate)
- Updating from a previous version.
If anyone updates from a previous version and has an older Ogone account, you will need to go to you Ogone account -> Configuration -> Technical information -> Global security parameters -> Compose the string to be hashed by concatenating the value of:
...and check the radio button for...
Each parameter followed by the pass phrase.
Anyone opening an account with Ogone now should have this checked by default.
As well as compatibility with the new security features of Ogone, there are also some other benefits to updating.
The system now uses the stores own thanks page so you get your customer back to your site.
The following parameters are exposed...
$ogbgcolor='#FFFFFF';
$ogtxtcolor='#000000';
$ogtblbgcolor='#E6E9F5';
$ogtbltxtcolor='#000000';
$ogbuttonbgcolor='#E7EAEF';
$ogbuttontxtcolor='#000000';
$ogfonttype='Verdana';
$oglogo='';
$oglanguage='';
$ogtemplate='';
So if you need to change any of those to change the look / feel of your Ogone payment page you can just set them in your vsadmin/includes.php file. The oglanguage can be for instance en_US, nl_NL, fr_FR. If you wish to set a logo for the Ogone payment page it must be stored on a secure (HTTPS) server and you must specify the full path. If you do not have a secure server you can store the logo image on Ogone's server and you should send and email to support AT ogone DOT com to request this.
Please do read our guide here on credit
card fraud.
That's all there is to it really - any comments
on the set up can be posted on our Support
Forum.
![]()
